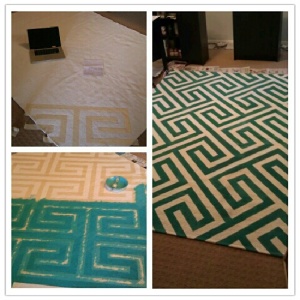
 I live in an apartment that I don't plan on being in for many more years, so it's hard for me to bring myself to spend on expensive home decor or furnishings specific to a temporary space. But it is my home for the time being, so I want it to be personalized. I have wanted new rug for the dining area, but rugs are SO expensive. I found this one that I really liked, but it was thousands of dollars.
Then I stumbled across this post on how to paint your own rug. And I thought, hmmm, I can do that! And I can do that with the pattern from the rug that I like!
So I did. First, I had to figure out the pattern of my desired rug. With the help of some graph paper, I sketched out one full layout of the core of the pattern (it repeats a few times over the size of the rug, so once I figured out the core, I could just repeat.)
The most time-consuming part was the taping. I had figured out my lines were all going to be 2 inches wide, so I bought 2 inch wide tape and that made it easier. With the help of a yard stick and a 90 degree angle (I just used a pice of paper) I taped it all out. The thing that kept messing me up was thinking I was taping what was going to be the colored part, when really your taping the white lines, so when you paint the un-taped portion of the rug and pull the tape off you have your pattern.
Taping took most of a day. Painting was quick, but I ran out of paint half way through. The tutorial I followed didn't give guidance on how much paint was needed. For this 6'x9' rug, I used about 18-19 oz. of acrylic paint and one 8 oz. bottle of textile medium.
My husband was skeptical when I told him what I had planned but he admits now he is impressed. All in all, my rug cost me about $75 and about 7 hours of my time. Not too bad!


No comments:
Post a Comment